/LiveSwitch.io%20(v2)%20-%20Solutions/LiveSwitch.io%20(v2)%20-%20By%20Industry/LiveSwitch.io%20(v2)%20-%20iGaming/ls-industry-igaming.svg)
/LiveSwitch.io%20(v2)%20-%20Solutions/LiveSwitch.io%20(v2)%20-%20By%20Use%20Case/LiveSwitch.io%20(v2)%20-%20Financial/ls-use-cases-financial-services-icon1.svg)
/LiveSwitch.io%20(v2)%20-%20Solutions/LiveSwitch.io%20(v2)%20-%20By%20Industry/LiveSwitch.io%20(v2)%20-%20Industry%20Section%20Page/ls-industry-virtual-classrooms.svg)


/LiveSwitch.io%20(v2)%20-%20Global%20Elements/Resources%20Icons/ls-resources-datasheets-iconm.svg)

/LiveSwitch.io%20(v2)%20-%20Global%20Elements/Developer%20Icons/ls-developers-get-started.svg)
/LiveSwitch.io%20(v2)%20-%20Global%20Elements/Developer%20Icons/ls-developers-cloud-guides.svg)
/LiveSwitch.io%20(v2)%20-%20Global%20Elements/Developer%20Icons/ls-developers-rest-api-references.svg)
/LiveSwitch.io%20(v2)%20-%20Global%20Elements/Developer%20Icons/ls-developer-support-faq.svg)
/LiveSwitch.io%20(v2)%20-%20Global%20Elements/Developer%20Icons/ls-developers-release-notes.svg)
/LiveSwitch.io%20(v2)%20-%20Global%20Elements/Developer%20Icons/ls-developers-cloud-console-login.svg)
/LiveSwitch.io%20(v2)%20-%20Global%20Elements/Developer%20Icons/ls-developers-install-using-docker.svg)
/LiveSwitch.io%20(v2)%20-%20Developer%20Center/ls-developer-center-cta-card.svg)

As developers, we often put a lot of focus on making sure that a new feature, library, or idea will even work. This means trying the most simple and basic version of an implementation before considering what may come after. Once this milestone has been passed, the next hurdle is often designing your application to work across multiple different environments, pieces of hardware, and even different orientations. It is one thing to create wireframes and designs but there is often a friction between what is in a design and what is possible with the technology you are using.
In this blog, I will be addressing one of these friction points. For most, a video call will consist of 2-3 people which can easily be displayed on any modern device, however, if your use case calls for large numbers of users on a call or if you have a mobile focused solution, screen real estate becomes very important.
In order to ensure that your application is both visually appealing and highly performant, you may want to implement pagination. Pagination allows you to control which users are displayed on the screen and limit the number of open connections which could lead to high resource hogging.
The first step is determining what your maximum displayed user count will be and how you want your local video to be displayed. Personally, once I am in a meeting and have proven that my video is flowing, I am happy to hide my local preview and focus on whoever else is talking or presenting in a call. For my application, I will add a pinning option where when set, the local video will remain on the screen and only the remote video tiles will be switched.
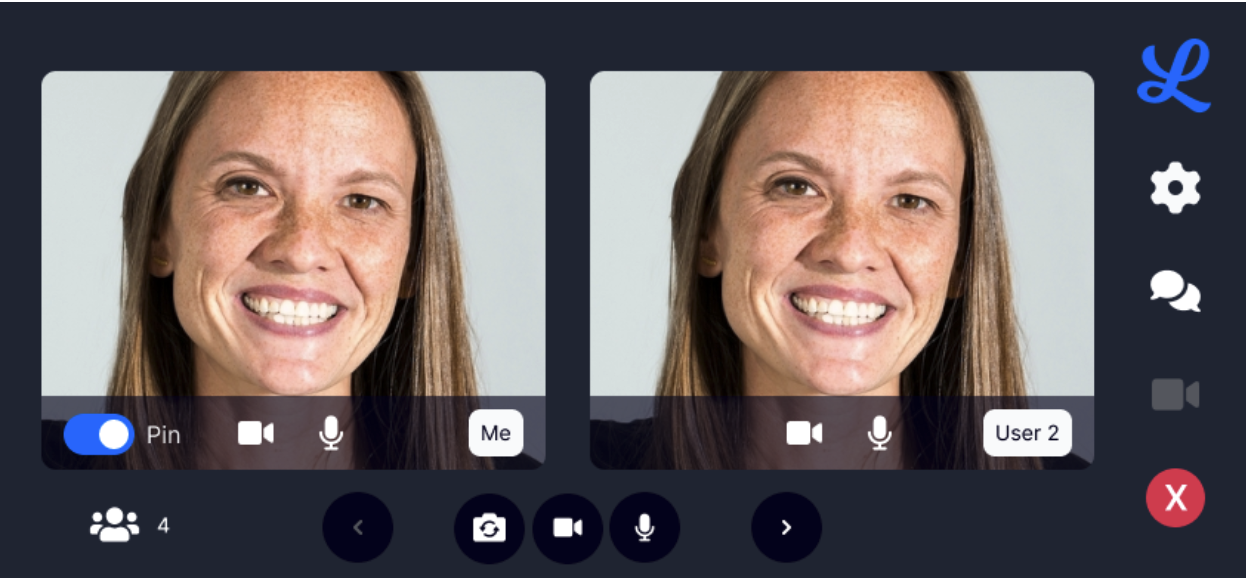
In the image above, you can see that my design will support 2 video tiles at a time and only my local video tile is able to be pinned. I have also added controls in the form of left and right carets that allow me to navigate from one page to another. In order to manage the state of my application correctly, I will focus on the following items - the number of users in the call, the maximum number of video tiles I will display, is my local video pinned, and active video tiles I am displaying.
Using these 4 pieces of information, I can implement pagination in my application. Let’s start with application logic before we hop into the connections themselves. We first need to define our functions to handle navigating to the next and previous pages.
function nextPage () {

  if ((pageNumber * maxDisplayVideo) - 1 < remoteCounter ) {

    pageNumber++;

           updateVideoLayout()

  }

}


function prevPage () {

  if (pageNumber > 1) {

    pageNumber--;

           updateVideoLayout();

  }

}
For our next function, we need to determine what our last page will be and only update our page count if we are not on the last page. In a similar fashion, we need to make sure that if we are on the first page, we do not change the page count with the previous page logic.
You can see that once we have updated the page number, both functions call our updateVideoLayout() function which does the heavy lifting for us.
function updateVideoLayout () {

     let videoList = new Array();

     if (store.state.pinLocal || pageNumber === 1) {

           for (let key in downstreamConnections) {

                 let remoteMedia = downstreamConnections[key];

                 if (remoteMedia.index === pageNumber) {

        videoList.push(remoteMedia)

      }

    }

  }

     else {

           for (let key in downstreamConnections) {

                 let remoteMedia = downstreamConnections[key];

                 if (remoteMedia.index === ((pageNumber * maxDisplayVideo) - maxDisplayVideo) || remoteMedia.index === ((pageNumber * maxDisplayVideo) - 1)) {

        videoList.push(remoteMedia)

      }

    }

  }

     // TODO: Open and close connections

  store.commit('setVideoList', videoList)

}
Inside this function, you can see we have 2 different flows. The first is when we know the local video tile is being displayed and the second is when only remote tiles will be displayed. I am using the videoList array to store the remoteMedia object for the connections I want to display. In the scenario where my local video is also displayed, I can only support 1 other video tile on the screen, otherwise, I can add 2.
In my application, I am keeping track of the downstream connections on the channel and only pulling in the one(s) I want to display based on my page number and the number of remote tile slots available in my user interface.
Thanks to my reactive state store, once I push the videoList, my screen will automatically be updated.
<div class="video-container">

     <div>

           <Video

                 v-if="store.state.localMedia && showLocal"

                 ask-height="240px"

                 ask-width="280px"

                 :maxLabelLength=5

                 :local-video="store.state.localMedia"

                 userName="Me"></Video>

     </div>

     <div class="basic-flex">

           <Video

                 v-if="store.state.videoList"

                 v-for="value in store.state.videoList"

                 :remoteVideo="value.media"

                 :index="value.index"

                 :userName="value.displayName"

                 :connection="value.connection"

                 ask-height="240px"

                 ask-width="280px"

                 :maxLabelLength=5

                 :maxIndex=2></Video>

     </div>

</div>
Inside the Video component, I can use the remoteMedia.getView() function to get the HTML Element that will then be inserted into my layout.
Another key piece here is how we manage the remote connections. We will want to build a running list of our connections and optionally open and close them based on what we are displaying and what our performance needs are. We will want to use this channel handler to be notified when a new remote connection is established on the channel.
channel.addOnRemoteUpstreamConnectionOpen((remoteConnectionInfo: any) => {

  store.state.downstreamConnections.add(remoteConnectionInfo)

});
Each piece of connectionInfo gives us a way to identify the different connections we could display but we have not opened the connections to allow us to save on network, memory, and CPU costs. We can now update our updateVideoLayout() function and replace the TODO with logic that will open the new connections we will be displaying and close the connections we will no longer be displaying.
We can create the following 2 helper functions to handle opening and closing a connection.
const openSfuDownstreamConnection = (remoteConnectionInfo: ls.ConnectionInfo, channel: ls.Channel) => {

     // Create remote media.

     const remoteMedia = new ls.RemoteMedia();

     const audioStream = new ls.AudioStream(remoteMedia);

     const videoStream = new ls.VideoStream(remoteMedia);

  if (channel) {

           // Create a SFU downstream connection with remote audio and video.

           const connection: ls.SfuDownstreamConnection = channel.createSfuDownstreamConnection(

      remoteConnectionInfo,

      audioStream,

      videoStream

    );

    // Open connection now that our handlers have been set

    connection.open();

           return [connection, remoteMedia];

  }

     return [];

};


const closeDownstreamConnections = async (downstreamConnections: [string : ls.SfuDownstreamConnection]) => {


     for (let key in downstreamConnections) {

           // Pull of the connection object

           const downstreamConnection = downstreamConnections[key].connection;

           // If the connection is not closed or in a state of closing, close it

           if (downstreamConnection.getState() !== ls.ConnectionState.Closed.valueOf() || downstreamConnection.getState() !== ls.ConnectionState.Closing) {

      downstreamConnection.close();

    }

  }

}
We can now replace our TODO with the following logic:
videoList.forEach(downstreamConnection -> {

  openSfuDownStreamConnection(downstreamConnection, channel)

})

closeDownStreamConnections(store.videoList)
Congratulations! You now have pagination working in your application. It is important to understand that with this solution, we are adding time to switch between the pages due to opening and closing the connections; however, this will result in a higher call quality since we are limiting the number of open connections to exactly what we need.
Take a look at how this has been implemented in our Vue sample application here or check out our live demo of the application. You can also sign up for a free 30-day trial to try this out on your own!
Need assistance in architecting the perfect WebRTC application? Let our team help out! Get in touch with us today!