/LiveSwitch.io%20(v2)%20-%20Solutions/LiveSwitch.io%20(v2)%20-%20By%20Industry/LiveSwitch.io%20(v2)%20-%20iGaming/ls-industry-igaming.svg)
/LiveSwitch.io%20(v2)%20-%20Solutions/LiveSwitch.io%20(v2)%20-%20By%20Use%20Case/LiveSwitch.io%20(v2)%20-%20Financial/ls-use-cases-financial-services-icon1.svg)
/LiveSwitch.io%20(v2)%20-%20Solutions/LiveSwitch.io%20(v2)%20-%20By%20Industry/LiveSwitch.io%20(v2)%20-%20Industry%20Section%20Page/ls-industry-virtual-classrooms.svg)


/LiveSwitch.io%20(v2)%20-%20Global%20Elements/Resources%20Icons/ls-resources-datasheets-iconm.svg)
/LiveSwitch.io%20(v2)%20-%20Global%20Elements/Developer%20Icons/ls-developers-get-started.svg)
/LiveSwitch.io%20(v2)%20-%20Global%20Elements/Developer%20Icons/ls-developers-cloud-guides.svg)
/LiveSwitch.io%20(v2)%20-%20Global%20Elements/Developer%20Icons/ls-developers-rest-api-references.svg)
/LiveSwitch.io%20(v2)%20-%20Global%20Elements/Developer%20Icons/ls-developer-support-faq.svg)
/LiveSwitch.io%20(v2)%20-%20Global%20Elements/Developer%20Icons/ls-developers-release-notes.svg)
/LiveSwitch.io%20(v2)%20-%20Global%20Elements/Developer%20Icons/ls-developers-cloud-console-login.svg)
/LiveSwitch.io%20(v2)%20-%20Global%20Elements/Developer%20Icons/ls-developers-install-using-docker.svg)
/LiveSwitch.io%20(v2)%20-%20Developer%20Center/ls-developer-center-cta-card.svg)
The LiveSwitch platform is a powerful and flexible tool. It can be deployed in a number of different ways and used to develop applications on a number of different development platforms. It even gives you choices in terms of what connection type you want to use. Typically when someone thinks about using WebRTC, they think of the SFUConnection type to handle their streams.
LiveSwitch allows you to use SFU, MCU, or P2P connections to stream your media in your application. SFU is most commonly used, as it provides the most flexibility in controlling your layout since each stream is delivered independent of the others from the media servers.
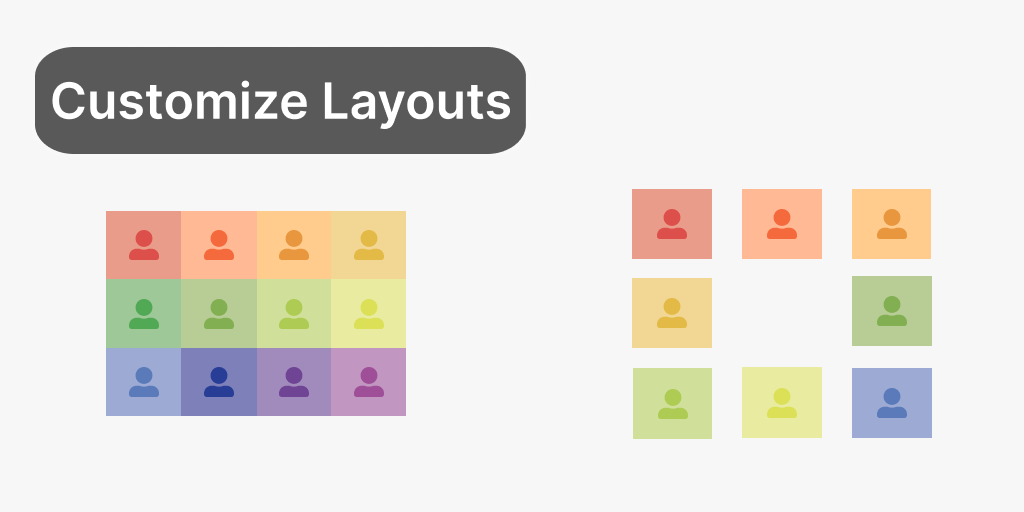
In this blog we will focus on MCU connections and how to create the same customized layouts that are often associated with SFU only applications. This feature is supported for our Private Cloud and Server based customers.
In order to customize the MCU layouts, there are two areas that you will need to focus on. The first is a series of changes in your application to enable this feature and set connection properties. The second is custom JavaScript, which will determine how the layout will be rendered.
The properties set on the connections will be used to group and sort the different incoming streams as part of your layout.
Let's jump into the code and show what this looks like.
To begin, we need to enable the custom layout feature, set the highest priority that a user can have, and set the supported grouping zones that we will be using in our layout engine. All three of these are set on the claim that is used when generating your session token. In simple use cases, the claim is often added in-line as part of the token generation logic.
const token = ls.Token.generateClientRegisterToken(

  config.applicationId,

  client.getUserId(),

  client.getDeviceId(),

  client.getId(),

  [new ls.ChannelClaim(channelId)],

  config.sharedSecret

);
In order to pass in our new settings, we will instantiate our claim separately and set these three properties on the claim before using it in the token.
var claim = new ls.ChannelClaim(channelId);

claim.setCanUpdateLayout(true);

claim.setAllowedLayoutPriority(1);

claim.setAllowedLayoutZones(["Host", "Participant", "Audience"]);


// Generate a token (do this on the server to avoid exposing your shared secret).

const token = ls.Token.generateClientRegisterToken(

  config.applicationId,

  client.getUserId(),

  client.getDeviceId(),

  client.getId(),

  [claim],

  config.sharedSecret

);
In this scenario, we enable the feature by setting CanUpdateLayout to true, set the highest priority for this client to be 1 (in this case the highest priority), and define the potential zones we will use for grouping.
The next application side change we need to make is to define the priority and the zone for the MCUConnection before we open the connection to the media server.
const mcuConnection = channel.createMcuConnection(audioStream,videoStream);

mcuConnection.setLayoutPriority(1);

mcuConnection.setLayoutZone("Presenter");

mcuConnection.open();
In your application, you should have some rules around how you will define the priority and zone based either on user roles or some other application specific business rules.
Now that our application code has been updated, it is time to define our layout logic. The LiveSwitch Console provides a text area to add your logic in the JavaScript Layout Function section.
There is an established object structure that you will need to use as you build your custom logic. The objects you will have available are as follows:
interface inputs {

  connectionId: string;

  connectionTag: string;

     content: string;

  clientId: string;

  deviceId: string;

  userId: string;

  size: Size;

  zone: string;

  priority: number;

  createdOn: number;

}


interface output {

  size: Size;

  channelId: string;

  applicationId: string;

}


interface layout {

  size: Size;

  frames: Frame[];

  crop: boolean;

  layoutMode: string;

}


interface Frame {

  origin: Point;

  size: Size;

  orientation: number; // 0, 90, 180, or 270

  connectionId: string;
}


interface Point {

  x: number;

  y: number;

}


interface Size {

     width: number;

     height: number;

}
Your custom layout logic must be in a layout function that follows this structure:
/**

* @param {inputs[]} inputs  The current inputs.

* @param {output} outputs  The current output.

*

* @return {Layout}         The desired layout.

*/


function layout(inputs, output) {

  ...

     return {

    size: output.size,

    frames: ...

  };

 }
For our custom layout, we will create a circular based layout to make our application feel more like an in person standup meeting.
In order to accomplish this, we will use the following layout function:
/**

* Apply a circular layout.

*/

function layout(inputs, output) {

     var center = {

           x: output.size.width / 2,

           y: output.size.height / 2

  };

     var radius = Math.min(output.size.width, output.size.height) / 4;

     // the top of the circle

     var angle = 1.5 * Math.PI;

     var frames = [];

     for (var i = 0; i < inputs.length; i++) {

    frames.push({

                 orientation: 0,

                 origin: {

                       x: (radius * Math.cos(angle) + center.x) - (radius / 2),

                       y: (radius * Math.sin(angle) + center.y) - (radius / 2),

      },

                 size: {
               width: radius,
               height: radius
           }

    });

    angle += (2 * Math.PI / inputs.length);

  }

     return {

           size: output.size,

           frames: frames

  };

}
In this example, all connections are treated equally. However, in our for loop, we could check the input object we are on, inspect the zone and priority, and change the size or group all connections in the same zone together before pushing them on the frames queue.
Congratulations! You now have a custom MCU layout that will be delivered to any downstream connections of your application. Using this pattern you can help reduce the computing done on each application device by moving it to the server and still get the layout flexibility you want.
If you are interested in this, first sign up for our free 30-day trial and build your sample application using MCU connections. You can then reach out to our Sales team to take the next steps.
You can also find additional documentation on custom MCU layouts here.
Need assistance in architecting the perfect WebRTC application? Let our team help out! Get in touch with us today!