/LiveSwitch.io%20(v2)%20-%20Solutions/LiveSwitch.io%20(v2)%20-%20By%20Industry/LiveSwitch.io%20(v2)%20-%20iGaming/ls-industry-igaming.svg)
/LiveSwitch.io%20(v2)%20-%20Solutions/LiveSwitch.io%20(v2)%20-%20By%20Use%20Case/LiveSwitch.io%20(v2)%20-%20Financial/ls-use-cases-financial-services-icon1.svg)
/LiveSwitch.io%20(v2)%20-%20Solutions/LiveSwitch.io%20(v2)%20-%20By%20Industry/LiveSwitch.io%20(v2)%20-%20Industry%20Section%20Page/ls-industry-virtual-classrooms.svg)


/LiveSwitch.io%20(v2)%20-%20Global%20Elements/Resources%20Icons/ls-resources-datasheets-iconm.svg)
/LiveSwitch.io%20(v2)%20-%20Global%20Elements/Developer%20Icons/ls-developers-get-started.svg)
/LiveSwitch.io%20(v2)%20-%20Global%20Elements/Developer%20Icons/ls-developers-cloud-guides.svg)
/LiveSwitch.io%20(v2)%20-%20Global%20Elements/Developer%20Icons/ls-developers-rest-api-references.svg)
/LiveSwitch.io%20(v2)%20-%20Global%20Elements/Developer%20Icons/ls-developer-support-faq.svg)
/LiveSwitch.io%20(v2)%20-%20Global%20Elements/Developer%20Icons/ls-developers-release-notes.svg)
/LiveSwitch.io%20(v2)%20-%20Global%20Elements/Developer%20Icons/ls-developers-cloud-console-login.svg)
/LiveSwitch.io%20(v2)%20-%20Global%20Elements/Developer%20Icons/ls-developers-install-using-docker.svg)
/LiveSwitch.io%20(v2)%20-%20Developer%20Center/ls-developer-center-cta-card.svg)
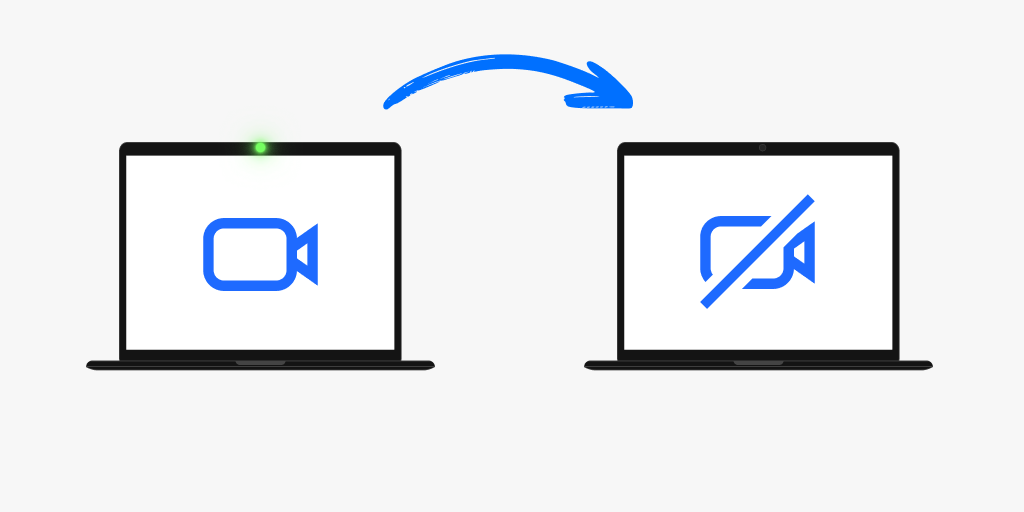
Controlling Microphone and Camera In-Use Indicators When Muting
LiveSwitch is a powerful WebRTC platform that allows developers to create real-time communication applications. The LiveSwitch Build SDK provides a robust foundation for building audio and video applications. In this post, we'll focus on a common scenario: how to mute a user's microphone and camera and have the device-in-use indicators match the mute state. A live sample is available with a matching GitHub repo to see how it's done:
LiveSwitch Muting Indicator Lights Sample App / Repo
Whether you're on a mobile device or on a desktop, there are several ways in which a user is made aware that their microphone or camera is in use. On a mobile device, the notification bar will have in-use icons. On a MacBook, you will have a green light turn on right next to the camera.
In the LiveSwitch SDK, there are several ways to mute media, and each approach can affect:
- Device in-use indicators
- Local preview / local recording
- Bandwidth usage
- Remote users’ awareness of the user's mute state
Note: To enhance clarity, the following will focus on muting the camera, but the same can be applied to the microphone.
Muting
To mute while ensuring the deactivation of the camera in-use indicators, two essential steps are required:
1. Create separate LocalMedia objects for audio and video.// Function to set up and display local video
async function startLocalMedia() {
try {
localAudio = new fm.liveswitch.LocalMedia(true, false);
await localAudio.start();
} catch (error) {
fm.liveswitch.Log.error("Error starting local audio.", error);
throw error;
}
try {
localVideo = new fm.liveswitch.LocalMedia(false, true);
await localVideo.start();
// attach localVideo.getView() to UI
} catch (error) {
fm.liveswitch.Log.error("Error starting local video.", error);
throw error;
}
}
localVideo.stop().then(_ => {

    // Update UI buttons/icons to indicate the user is muted

}).fail(ex => {

  fm.liveswitch.Log.error("Error muting local video.", ex);

});
Unmuting
To unmute, you simply need to call LocalMedia.start(). When that succeeds, the SDK will then have a hold of the camera again and the in-use indicators will turn on.
localVideo.start().then(_ => {

    // Update UI buttons/icons to indicate the user is no longer muted
}).fail(ex => {

  fm.liveswitch.Log.error("Error unmuting local video.", ex);

});
Device Access
The biggest drawback to this approach is that while the user is muted, a different application could potentially take control of the camera. Consequently, when attempting to unmute, the SDK will no longer be able to use that same camera. If another camera is available, it will be utilized; otherwise, the LocalMedia.start() will fail and throw an exception. Unfortunately, there are no existing methods to retain control of a camera while disabling the in-use indicators.
Local Previews
Muting using this approach of LocalMedia.start/stop will stop the local preview from being visible, which is expected because the camera is no longer in use.
Bandwidth Usage
Since the video source is no longer producing video data, the video encoder will produce empty frames. This will result in a large drop in bandwidth usage; however, it won't be zero.
Notifying Remote Users
The LocalMedia.start/stop approach will not notify remote users that the user has muted their camera. The video they receive will turn black, but it won't be clear if it's due to some other reason. The recommended approach to resolve this is done in the sample linked at the top of this article. It requires 2 changes:
1. Updating the connection to be muted.
let config = senderUpstreamConnection.getConfig();

config.setLocalVideoMuted(true);

senderUpstreamConnection.update(config).fail(ex => {

  fm.liveswitch.Log.error("Failed to update connection to have video muted.", ex);

    // This will fail to notify the remote users of the user's mute state, so we should probably retry. However, the LocalMedia object should have already been muted so there shouldn't be concern of the remote user's seeing the local user's video.

});
2. Monitor the downstream connection for changes to the mute state.
conn.addOnRemoteUpdate((_, newConnInfo) => {

    if (newConnInfo.getRemoteVideoMuted()) {

        // Update UI buttons/icons to indicate the remote user is muted

  } else {

        // Update UI buttons/icons to indicate the remote user is no longer muted

  }

});
Conclusion
With the LiveSwitch Build SDK, you can easily control a user's microphone and camera, and manage device-in-use indicators. This is essential for creating user-friendly real-time communication applications. You can further customize and enhance this functionality to meet your specific application's needs.
For more advanced features and in-depth integration, refer to the LiveSwitch documentation and explore other LiveSwitch capabilities.
That's it! You've learned how to control the microphone and camera with the LiveSwitch Build SDK. Happy coding!
Need assistance in architecting the perfect WebRTC application? Let our team help out! Get in touch with us today!